|
Size: 6242
Comment:
|
← Revision 36 as of 2023-02-01 10:44:29 ⇥
Size: 6708
Comment:
|
| Deletions are marked like this. | Additions are marked like this. |
| Line 27: | Line 27: |
| ''''' /!\ If the PICNM used to make the original blemish file is not consistent with the template, the program will say so and it will STOP. Otherwise, it will create the template file and, if necessary, remind you to define it in INIT_LITHOS.TXT.''''' | ''' /!\ If the PICNM used to make the original blemish file is not consistent with the template, the program will say so and it will STOP. Otherwise, it will create the template file and, if necessary, remind you to define it in INIT_LITHOS.TXT.''' |
| Line 50: | Line 50: |
| The '''s. Spot option''' masks a small region around a pixel/line center (p,l) from p-k to p+k and l-k to l+k. An additional input is a brightness threshold. If you enter this as zero, everything in the spot will be masked. However, if there is a bright blemish such as a cosmic ray hit in the spot, you can set the threshold to remove only the affected pixels. In this case, you can specify a large region (large k) and all the bright blemishes in that region will be masked without affecting the rest of the data. | The '''s. Spot option''' masks a small region around a pixel/line center (p,l) from p-k to p+k and l-k to l+k. An additional input is a brightness threshold (Note: See below for threshold information). If you enter this as zero, everything in the spot will be masked. However, if there is a bright blemish such as a cosmic ray hit in the spot, you can set the threshold to remove only the affected pixels. In this case, you can specify a large region (large k) and all the bright blemishes in that region will be masked without affecting the rest of the data. |
| Line 52: | Line 52: |
| Here is a sample TEMPFILE.pgm image before masking was applied: | Here is a sample TEMPFILE.pgm image before masking is applied: |
| Line 55: | Line 55: |
'''Figure 00: Image Prior to Applying Mask''' |
|
| Line 77: | Line 79: |
| '''Figure 00: Image after Applying Blemish Mask''' |
|
| Line 93: | Line 97: |
| * '''threshold:''' Digital Number (DN) representing the lowest threshold for brightness in the range, where 0 is dark, and will result in all brightnesses being masked. | * '''threshold:''' Digital Number (DN) representing the lowest threshold for brightness in the range, where 0 is dark, and will result in all brightnesses being masked. Note: The DN within BLEMISHES has been rescaled by 255/(Brightness DN). So if the original DN is 398 and the max is 1410, then the new DN will be 71 because the number is truncated. So if you want to mask 398, you need to enter 70 for the threshold. |
| Line 98: | Line 102: |
'''Figure 00: Image Displaying Blemish Mask Options''' |
|
| Line 119: | Line 125: |
| ''''' /!\ If the PICNM used to make the original blemish file is not consistent with the template, the program will say so and it will STOP. Otherwise, it will create the template file and, if necessary, remind you to define it in INIT_LITHOS.TXT.''''' | ''' /!\ If the PICNM used to make the original blemish file is not consistent with the template, the program will say so and it will STOP. Otherwise, it will create the template file and, if necessary, remind you to define it in INIT_LITHOS.TXT.''' |
| Line 152: | Line 158: |
| ''(Updated by JRW)'' | |
| Line 153: | Line 160: |
| (Based on [[http://sbib.psi.edu/wiki_ext/refman.pdf|SPOC v3.02A PDF]]/LITHOSPHERE/blemishes.f File Reference.) | Based on [[http://sbib.psi.edu/wiki_ext/refman.pdf|SPOC v3.02A PDF/LITHOSPHERE/blemishes.f File Reference.]] |
blemishes
Category B |
Version 3.0 |
Description
This program generates BLEMISH files which mask bad pixels in individual or multiple images.
This procedure creates a blemish (.BLM) file for an image that lives in the BLEMISHES subdirectory.
Required Files
- BLEMISHES/ - Directory containing BLEMISH files for individual images and BLEMISH templates for multiple affected images.
IMAGEFILES/ - Directory containing the .DAT file for the image; this program displays the image with masking for user inspection, and reads the Digital Number (DN) of pixels of interest.
SUMFILES/ - Directory containing the SUMFILE for the image to mask; this program reads NPX (number of pixels), and NLN (number of lines);
INIT_LITHOS.TXT - this program reads the parameter BLEMISH (if it exists), which references any existing template for masking bad pixels common to multiple images.
BLEMISHES/TEMPLATENAME.BLM - template BLEMISH file for each INIT_LITHOS BLEMISH entry.
Optional Files
BLEMISH/PICNM.BLM - Existing image BLEMISH file for deletion or editing.
Output Files
- TEMPFILE.pgm - Display of the image with masking applied.
BLEMISHES/PICNAME.BLM - Generated or edited BLEMISH (.BLM) file.
User Warnings
 If the PICNM used to make the original blemish file is not consistent with the template, the program will say so and it will STOP. Otherwise, it will create the template file and, if necessary, remind you to define it in INIT_LITHOS.TXT.
Using blemishes
Initial Inputs
 Input 12-character picture name
P00045000455
 gc TEMPFILE.pgm

 b. Block
 s. Spot
 q. Quit
Choose the option for the type of blemish you want to work with:
The b. Block option masks a square block of the image specified by a minimum and maximum pixel and line. This type of blemish is typically used for missing or hashy lines due to downlink errors.
The s. Spot option masks a small region around a pixel/line center (p,l) from p-k to p+k and l-k to l+k. An additional input is a brightness threshold (Note: See below for threshold information). If you enter this as zero, everything in the spot will be masked. However, if there is a bright blemish such as a cosmic ray hit in the spot, you can set the threshold to remove only the affected pixels. In this case, you can specify a large region (large k) and all the bright blemishes in that region will be masked without affecting the rest of the data.
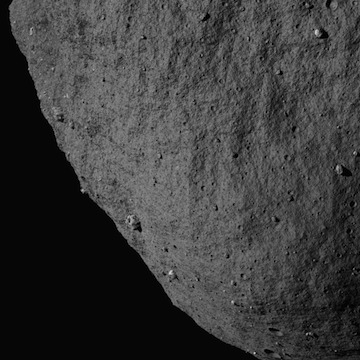
Here is a sample TEMPFILE.pgm image before masking is applied:

Figure 00: Image Prior to Applying Mask
Block Blemish Options
 Input pxmn, pxmx, lnmn, lnmx
512 612 250 350
 gc TEMPFILE.pgm

 b. Block
 s. Spot
 q. Quit
After you choose b. Block you must specify:
pxmn, pxmx: must be in the range [1:NPX] (where NPX is the number of pixels in image)
lnmn, lnmx: must be in the range [1:NLN] (where NLN is the number of lines in image)
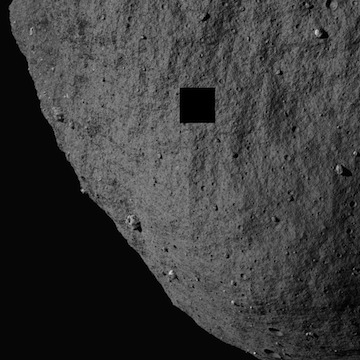
This sample shows the image after block masking was applied:

Figure 00: Image after Applying Blemish Mask
Spot Blemish Options
 Input bad px/ln center, half-size. threshold.
512 250 25 100
 gc TEMPFILE.pgm

 b. Block
 s. Spot
 q. Quit
After you choose s. Spot you must specify:
px/ln center: Vector with element values in the range ([1:NPX],[1:NLN]) (where NPX is the number of pixels in image, NLN is the number of lines in image)
half-size: Half-size of masked area in pixels, e.g. a half-size of 2 will result in a masked area of 4 pixels x 4 pixels.
threshold: Digital Number (DN) representing the lowest threshold for brightness in the range, where 0 is dark, and will result in all brightnesses being masked. Note: The DN within BLEMISHES has been rescaled by 255/(Brightness DN). So if the original DN is 398 and the max is 1410, then the new DN will be 71 because the number is truncated. So if you want to mask 398, you need to enter 70 for the threshold.
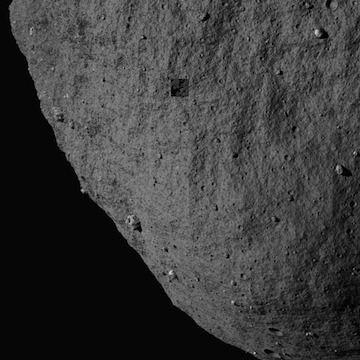
This sample shows the image with spot masking and DN threshold applied:

Figure 00: Image Displaying Blemish Mask Options
Quit Blemishes Option
 Save blemish file? (y/n)
y
 Create/change template file? (y/n)
n
After you choose q. Quit you must specify whether to save the blemish file and whether to create or change a template file.
BLEMISH Templates
In the event that a camera has bad pixels common to all images, you can create a template that masks these pixels in all that camera's images. The template is specified in the INIT_LITHOS.TXT file with the key word BLEMISH.
- For example, DAWN has two framing cameras with image names starting with FC1 and FC2. FC2 images all have several blemishes in the same places. A template in INIT_LITHOS specified by BLEMISH='FC2#########' will correct all of these images without having thousands of individual blemish files. If an image contains additional blemishes it can have its own file with just those additional blemishes.
In order to create a TEMPLATE, you must create a blemish file for one of the affected images with only the common bad areas masked. The procedure will ask: 'Save blemish file? (y/n)' and then 'Create/change template file? (y/n)'. If you enter 'y' and 'y', you will be asked for a 12 character template name with the common characters of the image names in their proper positions and # everywhere else.
 If the PICNM used to make the original blemish file is not consistent with the template, the program will say so and it will STOP. Otherwise, it will create the template file and, if necessary, remind you to define it in INIT_LITHOS.TXT.
The following samples show this sequence of actions and the output file:
 Save blemish file? (y/n)
y
 Create/change template file? (y/n)
y
 Input 12 character template
P00045######
 Add: BLEMISH='P00045######' to INIT_LITHOS.TXT
Example P00045######.BLM file:
   488   225
   489   225
   490   225
etc...
   534   275
   535   275
   536   275
   537   275
END
The BLEMISH file contains a list of pixel/line locations to be masked, appended with the end-of-file identifier, 'END'.
(Compiled by DL) (Updated by JRW)
Based on SPOC v3.02A PDF/LITHOSPHERE/blemishes.f File Reference.
