SPC GUI Tool (Sgt)
We have built three tools in javascript to provide key GUI to help SPC processing. LMRK_DISPLAY.pgm or TEMPFILE.pgm gets converted and placed into a webserver directory and displayed in a webpage that allows for measurement and analytical tools to aid in alignment. It does not send the data back to SPC, but can be copied and pasted back into lithos, autoregister, and register.
Download the code: https://oort.psi.edu/public/776aba
For MMX -- the most up to date version is in GitHUB, SPC-Class-data https://github.com/StereoPhotoClinometry/SPC-Class-data in the "static" directory
Webserver Requirements
If you are using a mac, then apache is already loaded, it just needs to be started. The webserver directory is /Library/WebServer/Documents, which is where you put everything. To make things easier, you will want an "index.html" that contains hyperlinks to the program (which is much easier than typing the entire path to the script) -- Example: spcTools-index.html
Two directories are needed: static/ and data/
* static/ - hold the javascript files that host the three programs and javascript classes. It must be at the root of the webserver (top directory).
- static/sproutcore -- required javascript class library
- static/landmarks -- tool to aid in lithos alignment
- static/register -- tool to aid in register alignment
- static/autoregister -- tool to aid in autoregister alignment
* data/ - jpeg copies of LRMK_DISPLAY.pgm and TEMPFILE.pgm are copied over as landmarks.jpg, autoregister.jpg and register.jpg. Each program will display those files
These directories allow each person their own working space. These are optional, and only needed if you have more than one person processing on the same computer.
- data/ep
- data/jw
- data/dl
- data/spc1
- etc...
index.html - the landing html file that points to each of the SPC GUI tools. This is typically built by hand. If there is a software updated to a module, then there will be a new "hash" (obnoxious string) after the "en". That has to match whatever is installed in static/<module>/en/<hash>
<a href=static/landmarks/en/8eeab8f3d8effb709050e5f13a0f95a219438e80/index.html>landmarks2</a>
Working Directory Requirements
Within the working directory, you need to convert the LMRK_DISPLAY01.pgm and TEMPFILE.pgm to jpeg files in a webserver directory. This is best done using ImageMagic. The following script is the minimum, but we've also made a more robust script (updateDisplay.sh) in /opt/local/spc. Because we may have more than one person running SPC on a machine, we have set it up to have subdirectories. If you need to use a subdirectory, then use one of the predefined initials, i.e. $webpath/data/ep/landmarks.jpg
Helpful script
You can run this script in the background when you are doing a lot of work. Every second, it will update the images used in the programs from your directory. Note - if your internet connection is slow, you might need to increase the sleep delay.
To run this script, you run it in its own terminal window in the SPC working directory. Then the script will look for local copies of LMRK_DISPLAY1.pgm and TEMPFILE.pgm and convert it to jpg files in the webserver directory. You need ImageMagick for this to work. Here is a more elegant script -- updateDisplay.sh
 # ! /bin/bash
# webpath="/Library/Server/Web/Data/Sites/Default/"       # Mac OS Server
# webpath="/var/html/"                                    # Typical linux machines
webpath="/Library/WebServer/Documents/"                 # Standard Mac OS

while [ 1 ]
do
        convert LMRK_DISPLAY1.pgm $webpath/data/landmarks.jpg
        convert LMRK_DISPLAY1.pgm $webpath/data/autoregister.jpg
        convert TEMPFILE.pgm $webpath/data/register.jpg
        sleep 1
done
SPC GUI Tool (Sgt) -- Program Manual
Start by going to the web display for the computer you are using. Examples:
http://ormacsrv2.lpl.arizona.edu
http://tripp.psi.edu
http://localhost/
http://10.0.0.1/
This will give you a menu that will give links for Landmarks, Register, and AutoRegister.
Landmarks
1. Loading the tool.
Go to the URL above to load the Landmarks tool. The page that is loaded will look something like this.
https://ormacsrv1.lpl.arizona.edu/static/landmarks/en/8eeab8f3d8effb709050e5f13a0f95a219438e80/
- Reloading the page will also bring you back to this state.
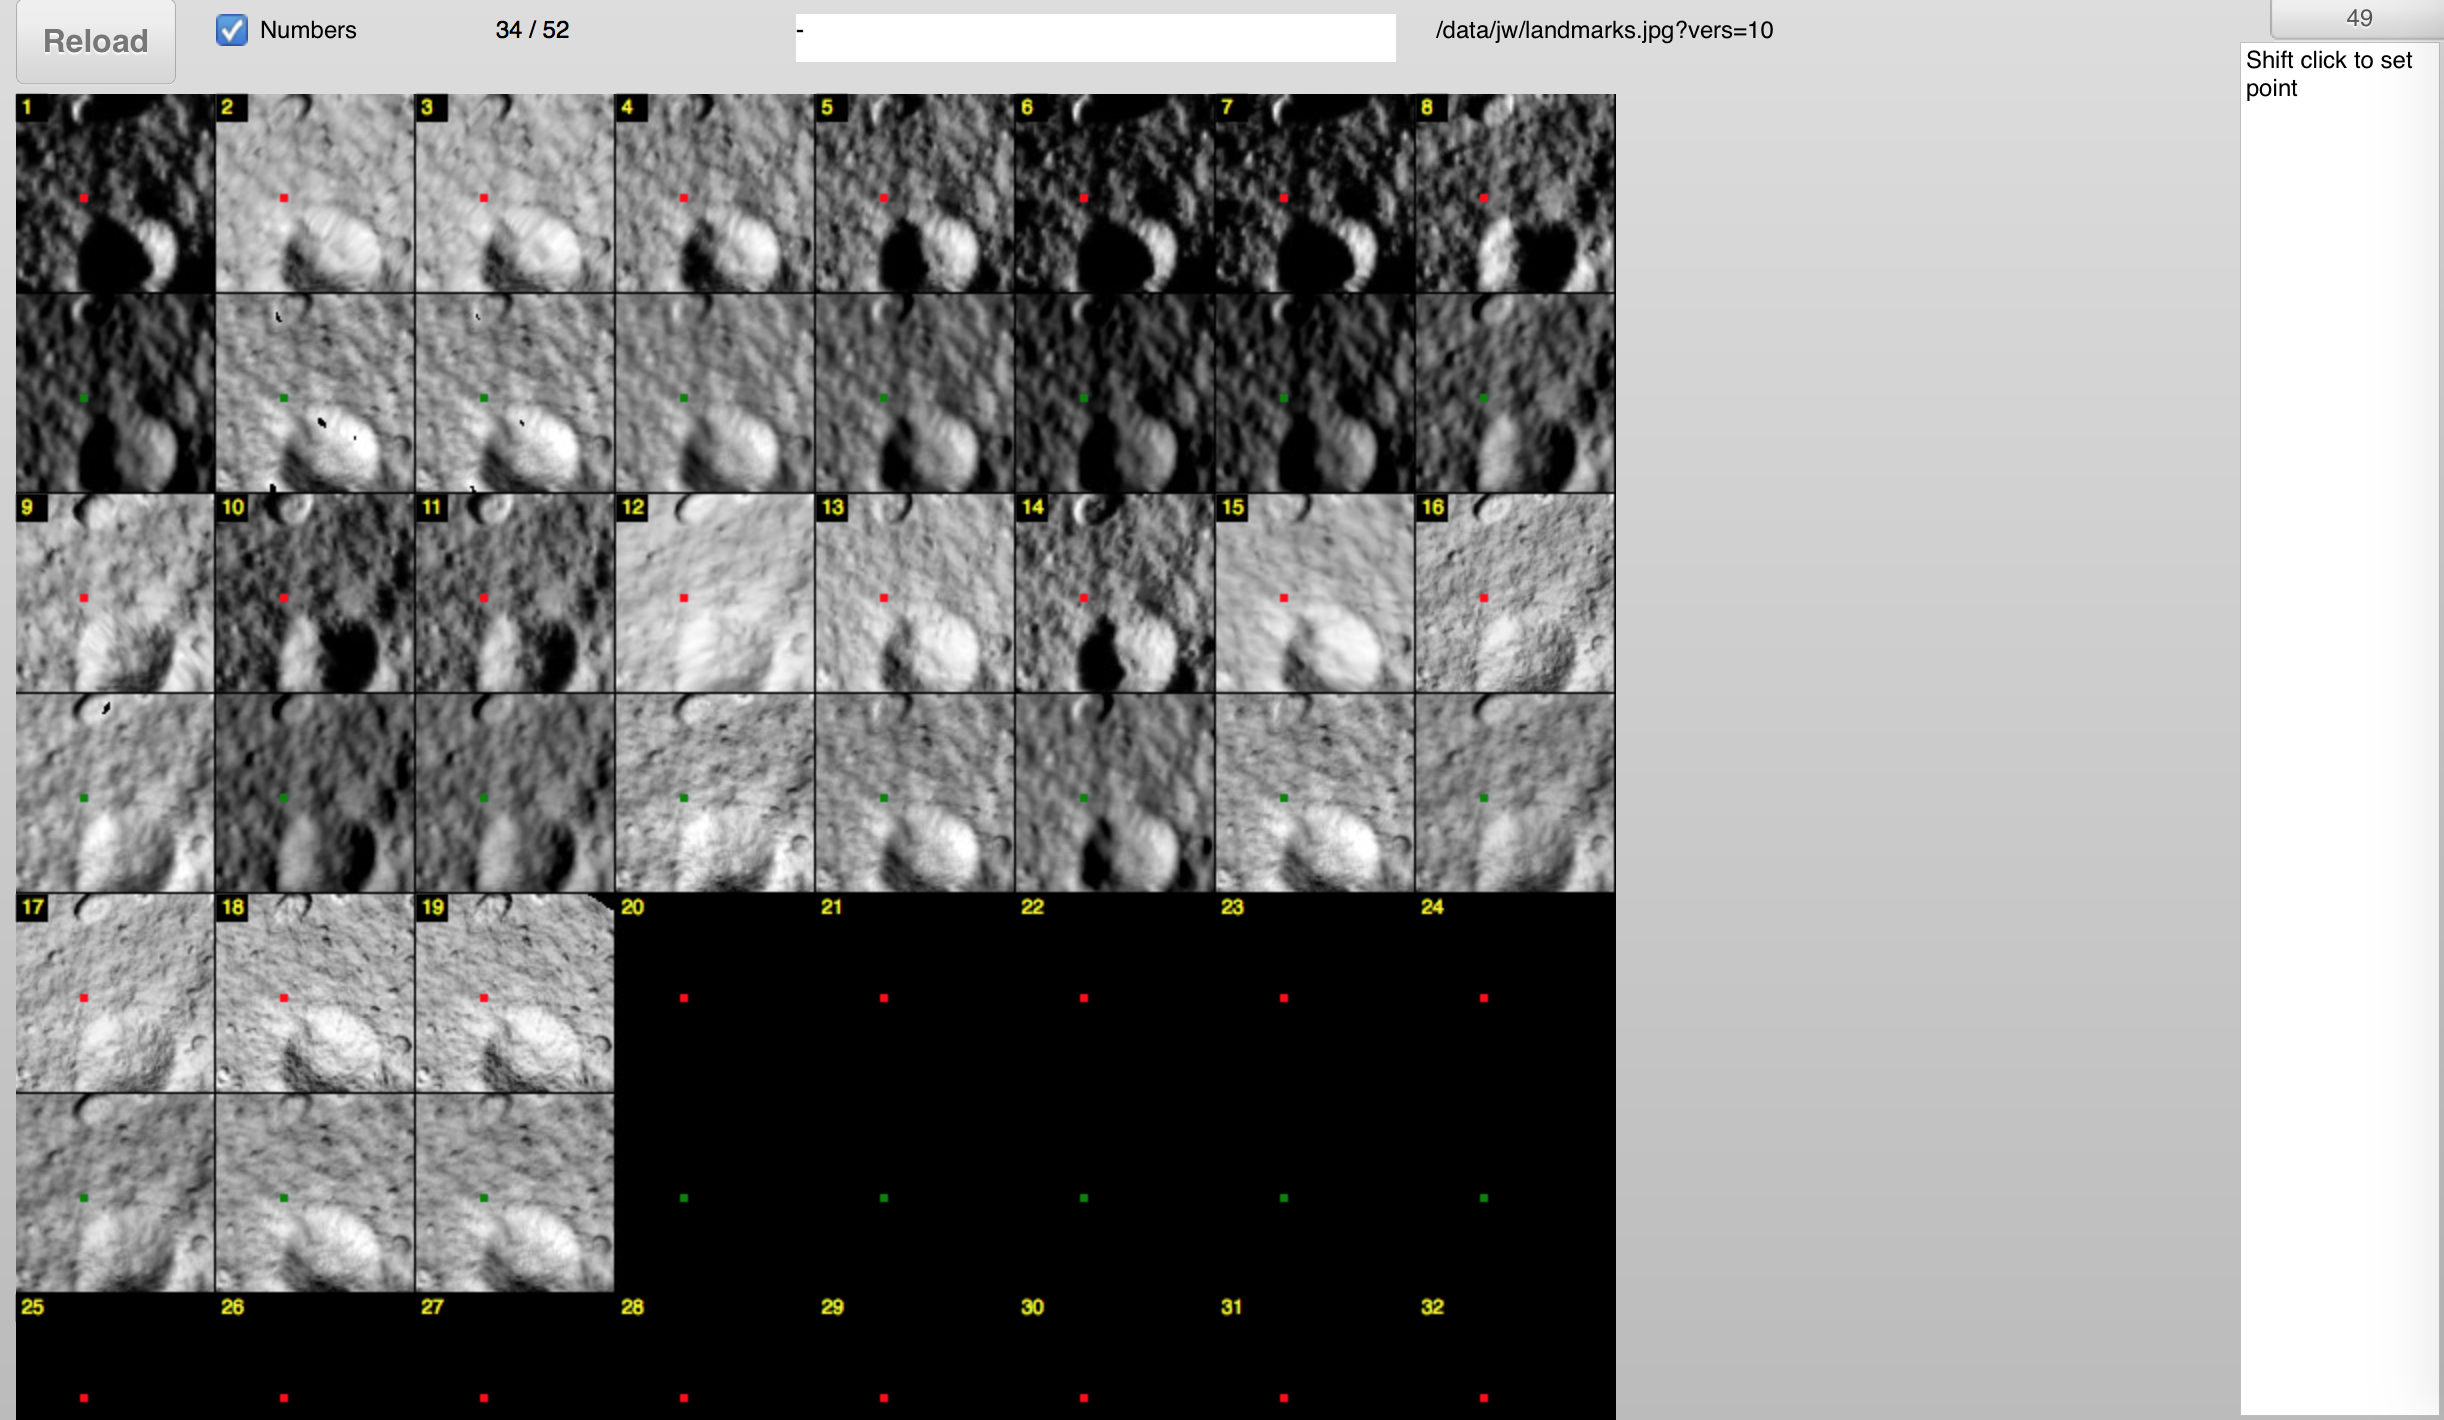
You will see a something similar to the below image. The top has some useful information that is described below. Most of the screen will be filled with LMRK_DISPLAY1.pgm. The odd rows show each image added to the landmark, while the even rows show the maplet under the same viewing conditions as the image above it. Each image will have the image number listed in the upper left.
2. Refreshing the display.
Frequently you need to refresh the display (for example to load a new landmark), but you don't want to reload the page and lose various settings. There are two ways to do this. The first is to hit "Reload" in the upper left portion of the Web Tool. The other way is to press the spacebar button (Note: You'll have to click somewhere on the Web Tool to enable the spacebar option). Each time you reload the images using either of these options, the file location will be incremented. In the above example this location is "/data/jw/landmarks.jpg?ver=10" which means the Web Tool has been reloaded 10 times.
3. Aligning images with the topography.
Clicking on any of the images or maplets will create red and green dots every 100 pixels. Each dot will be at the same location for every image or maplet. Red dots are displayed over the image, while green dots are displayed over the maplet. When you click, the px/ln location will be updated at the top of the page. This value is being displayed as "52/22" in the example image.
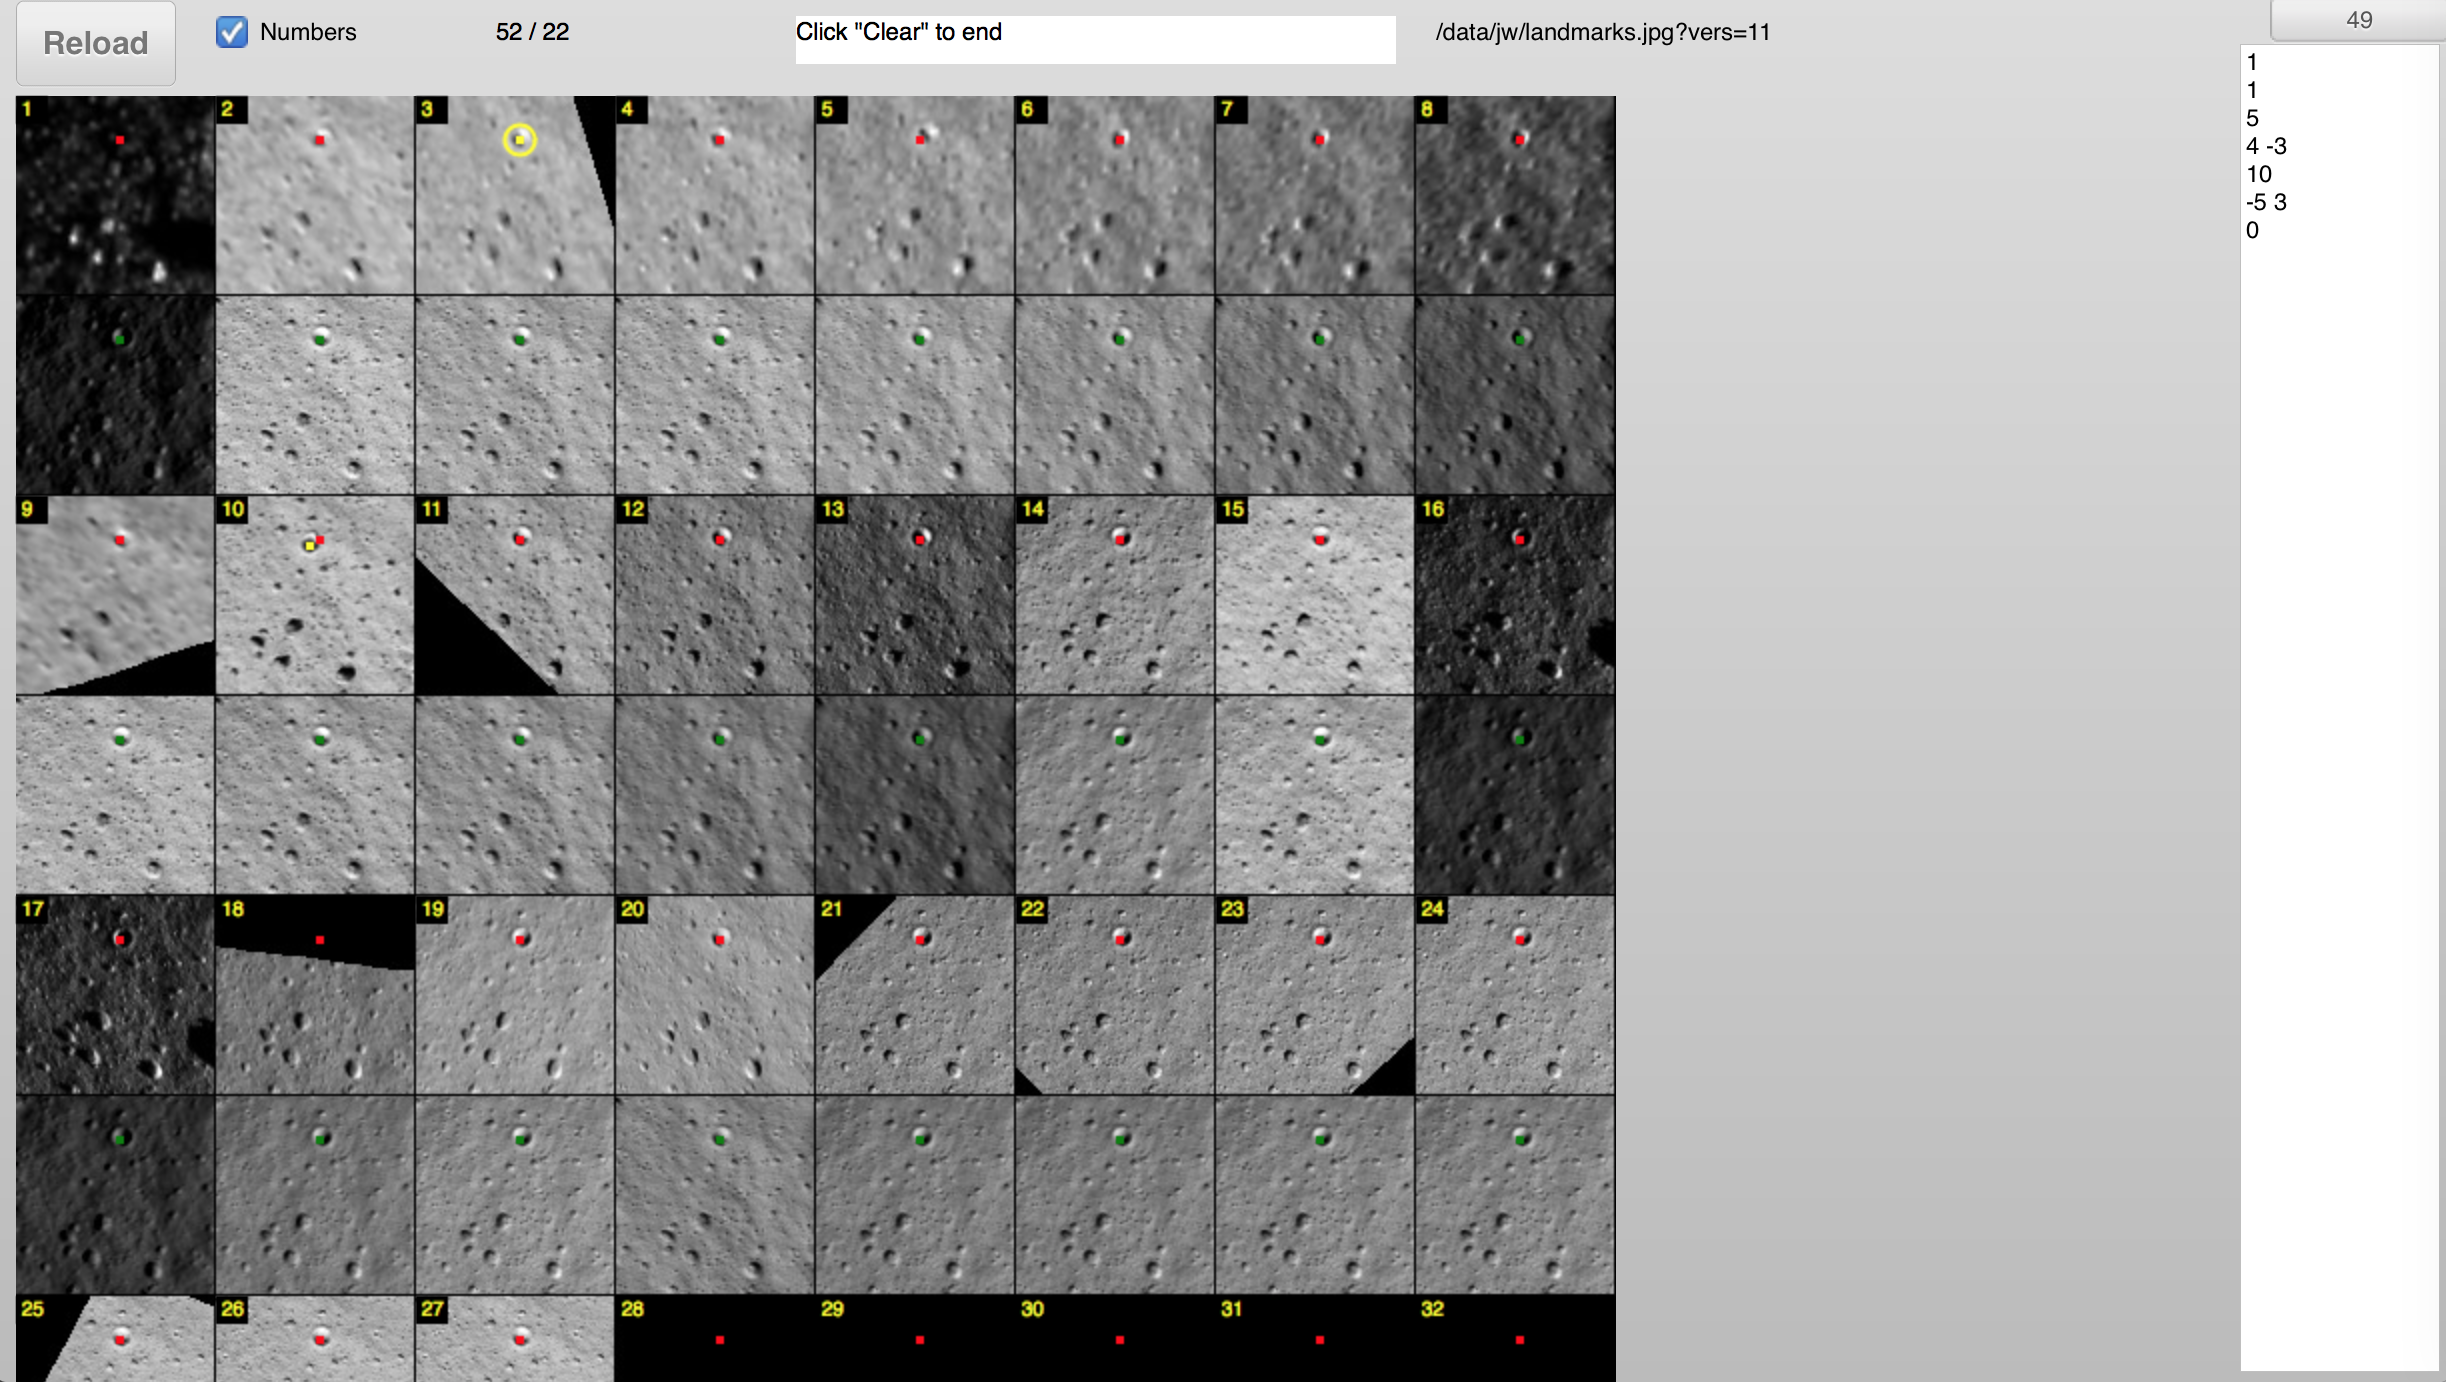
Once you have found an easily identifiable feature near the center of an image or maplet you will shift-click on it. This will bring up a yellow dot with a circle around it. Now when you click on that same feature in a different images the right hand box will fill with LITHOS commands that will shift that image the appropriate px/ln values. The green and red dots will not move from where you shift-clicked, but there will be a new yellow dot in the last place you clicked. In the example below image 5 and 10 are not properly aligned, but they have both been clicked so the right hand box is ready to be copy/pasted into LITHOS.
4. Identifying an offset.
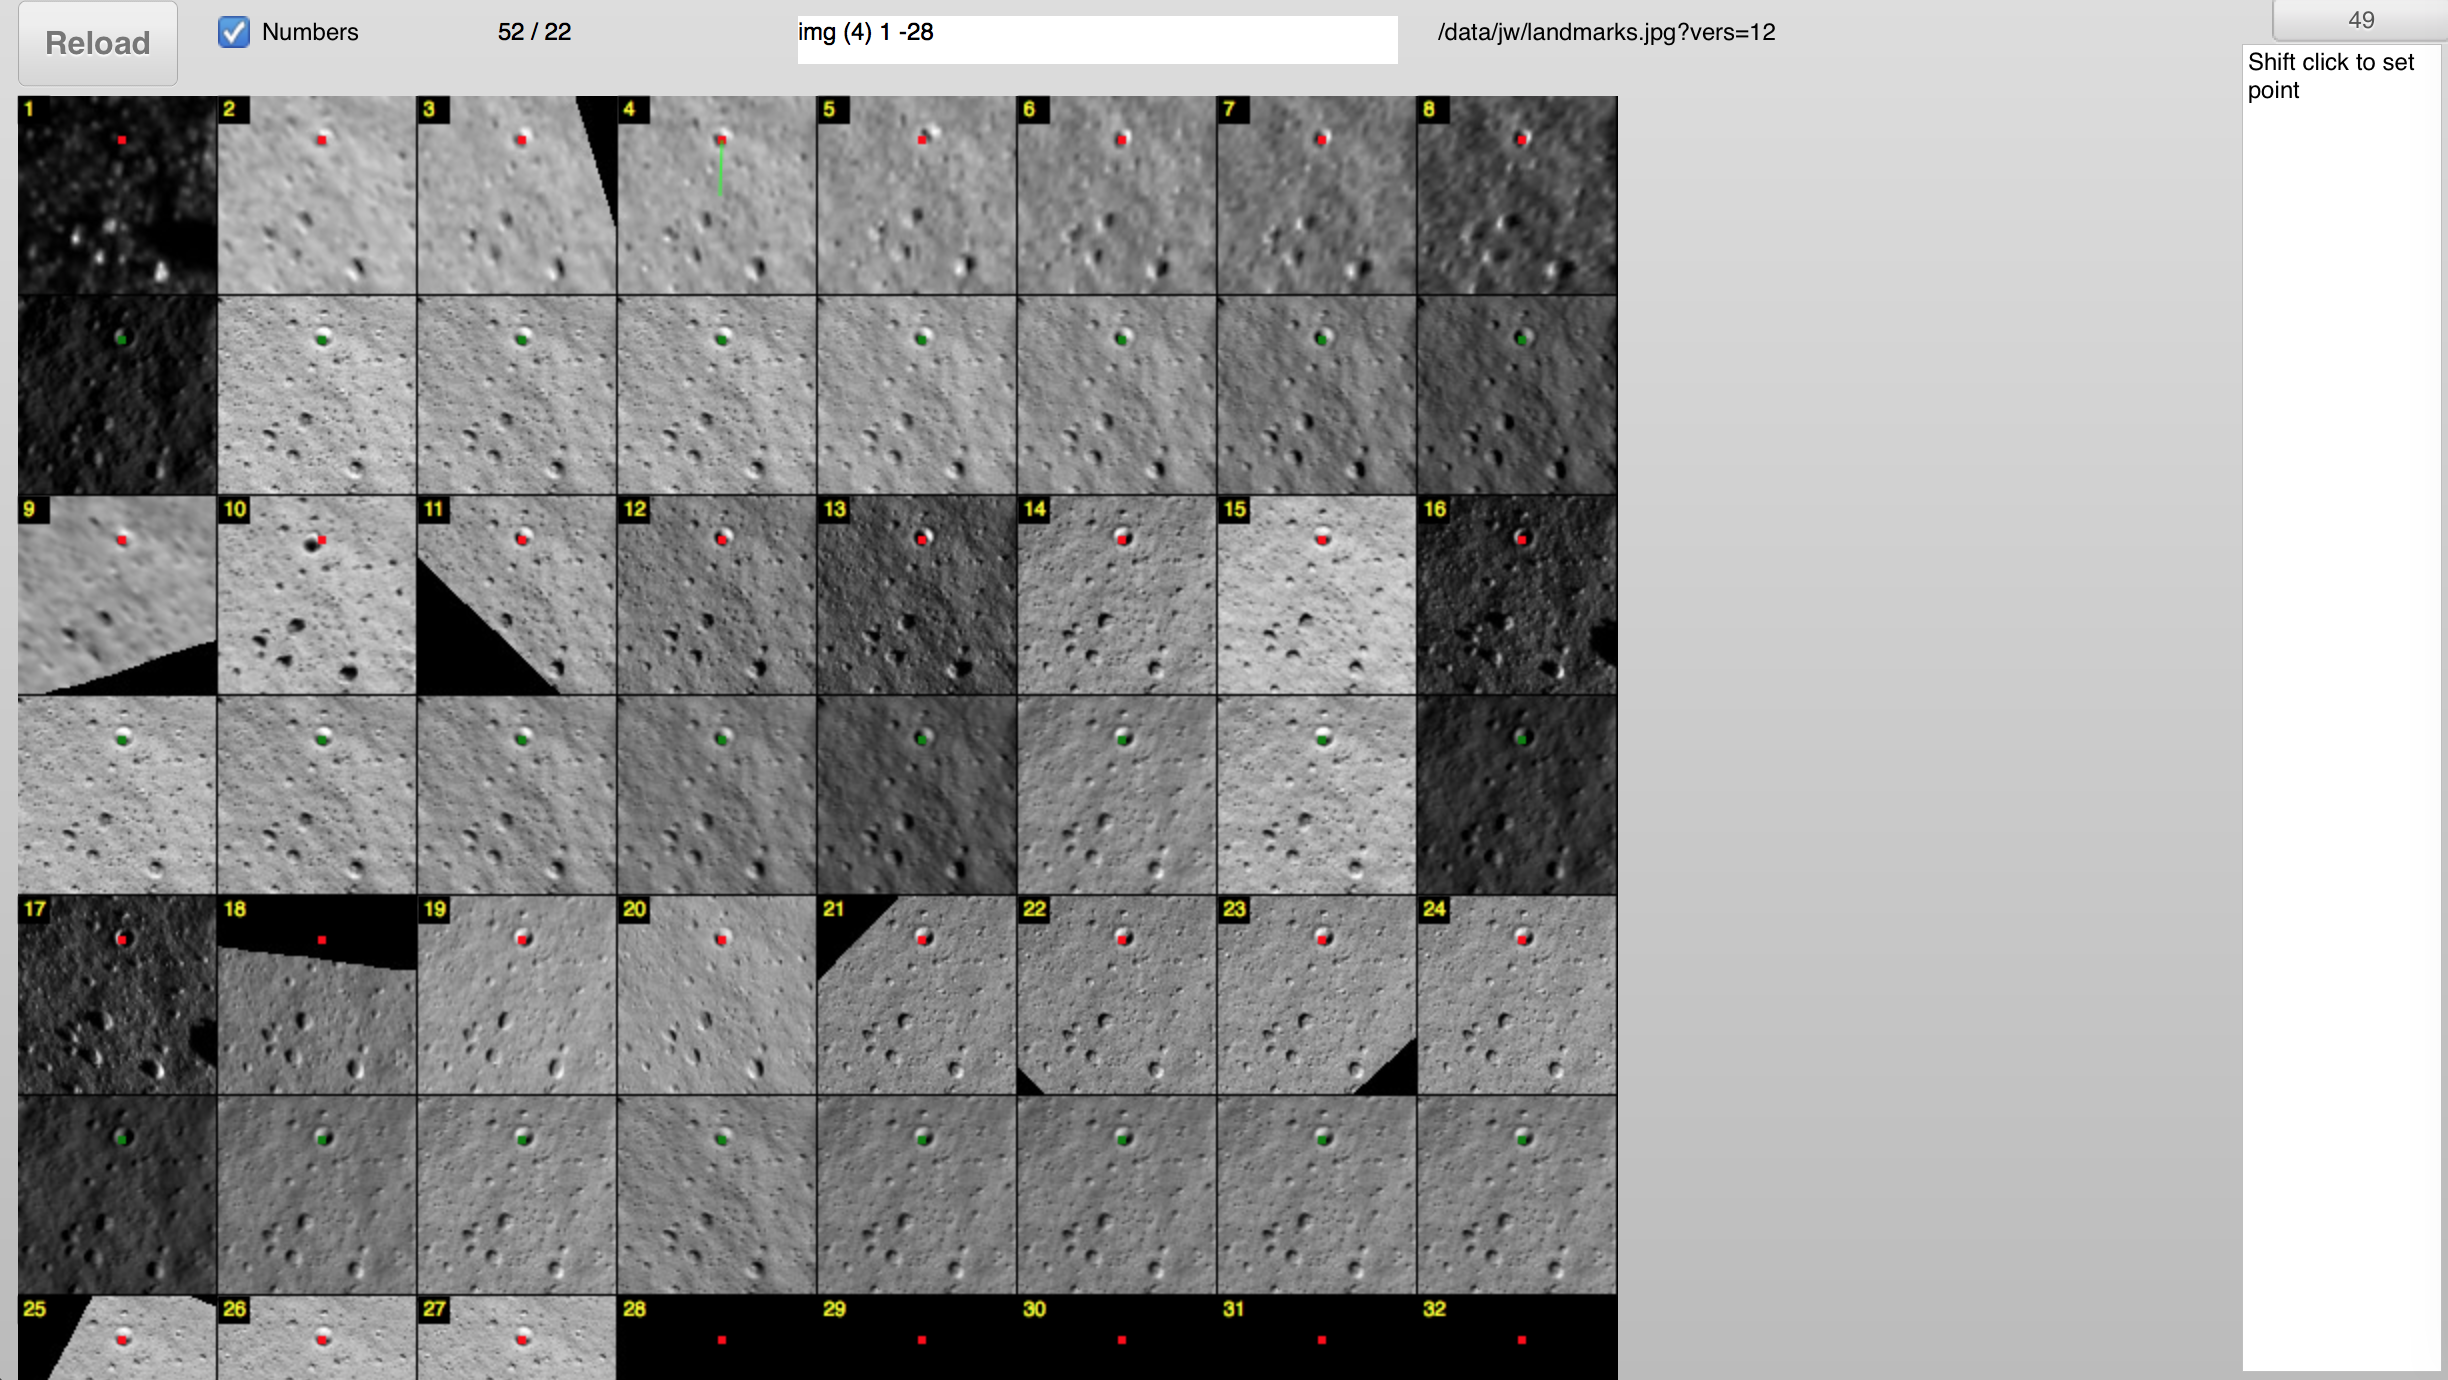
You can perform a Click-drag to get the px/ln offset between two points. This will also create a green line connecting the location you clicked to the location where you let go of the mouse. This offset will be displayed in the top center box. This offset can be used to move individual images or to move the location of the center of a maplet. In the example below, moving the maplet 1/-28 will move the crater under the red dot to the center of the maplet.
5. Other options. Normally you will not change these parameters.
Loading the appropriate directory and choosing the half-pixel size of the maplet. The upper right hand of the screen will have a button that says "49." Clicking on this will bring up a menu that will allow you to choose either the directory "ep", "jw", "dl", etc., or the half-pixel size "49", "34", "24". If you are using the "Helpful Script" shown towards the top of the page you should not select a directory since the GUI tool initially loads the default directory. If you have used a different script you'll have to load the directory where the images were placed. The half-pixel size will almost always be the default value of 49, but there are rare situations where it may be useful to use landmarks with less than 99x99 pixels.
The image number can be toggled by clicking the checkbox labeled "Numbers." Normally you'll want to see the image number, but sometimes you will want to see what is being obscured by the image number in the upper left portion of the image or maplet.
Register
1. Load the Web tool. From the main Web Tool page (given above the "Landmarks" section), clicking on Register will lead to a link that looks like this:
https://ormacsrv1.lpl.arizona.edu/static/register/en/f97d644ccc0a7d42ec2fa1ddfb7a298c6fa60507/
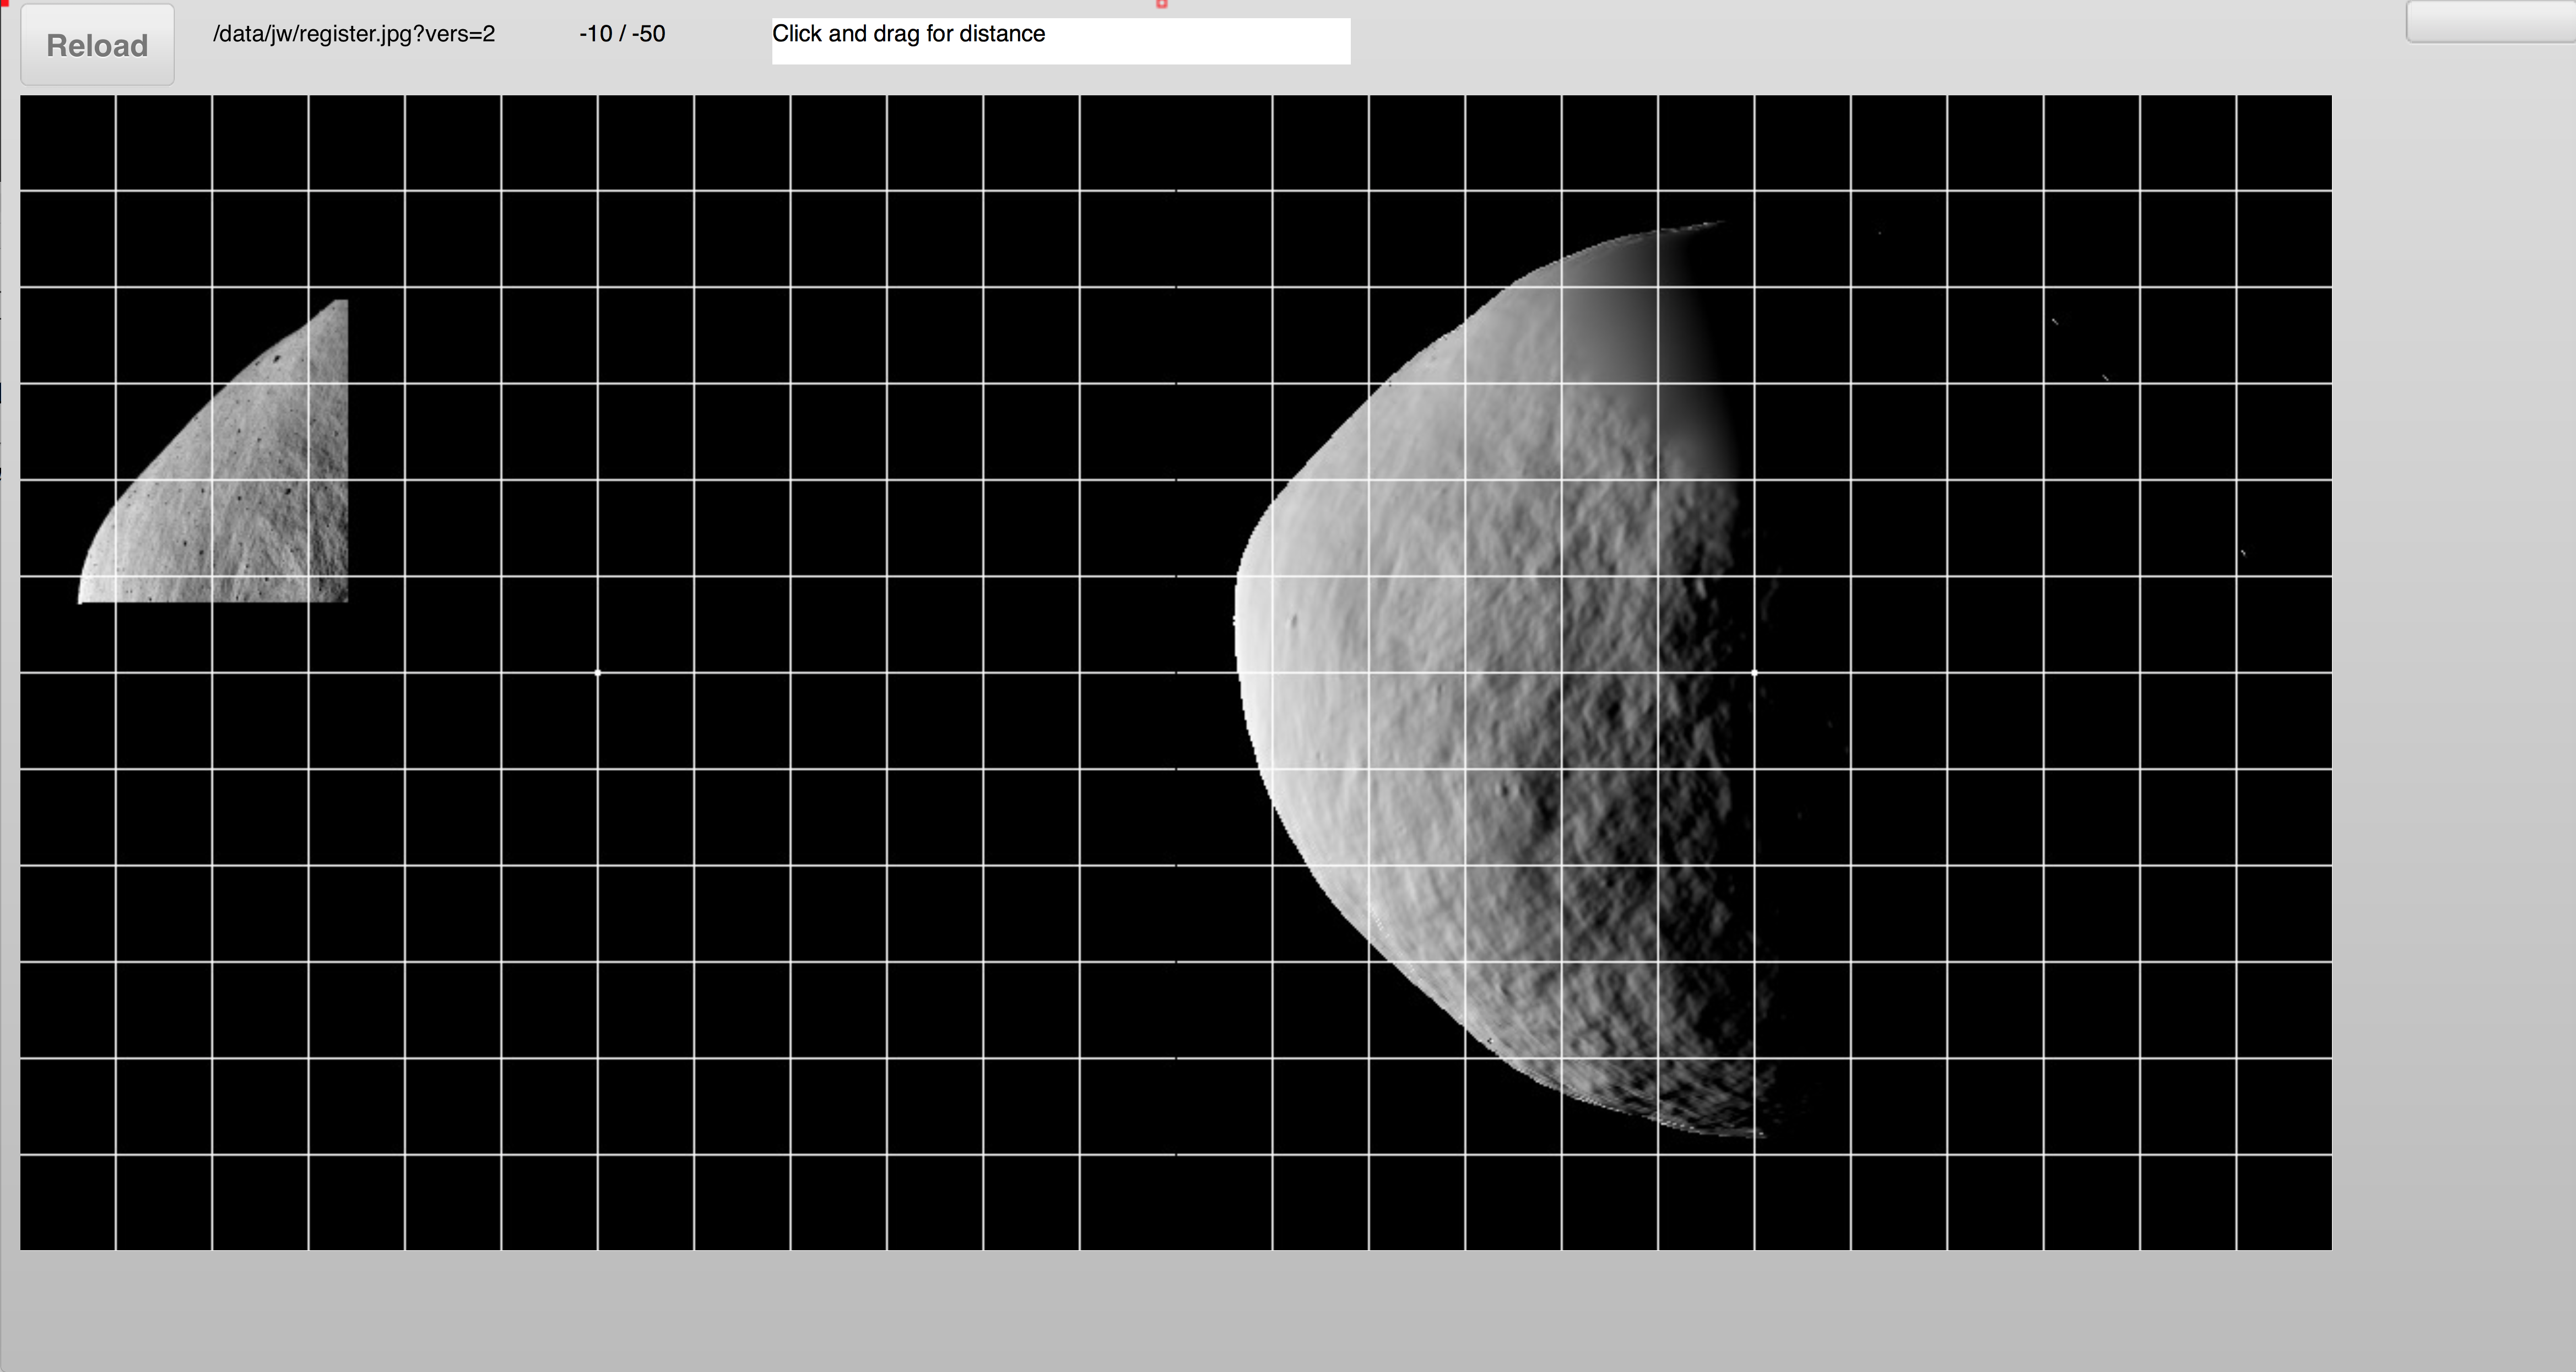
The Register page will look like this.
The commands (such as the spacebar-Reload and Click-drag) and buttons (such as selecting a directory) are nearly identical to those in "Landmarks." Differences are given below.
The main difference between "Landmarks" and "Register" is the displayed image. In this image is TEMPFILE.pgm


